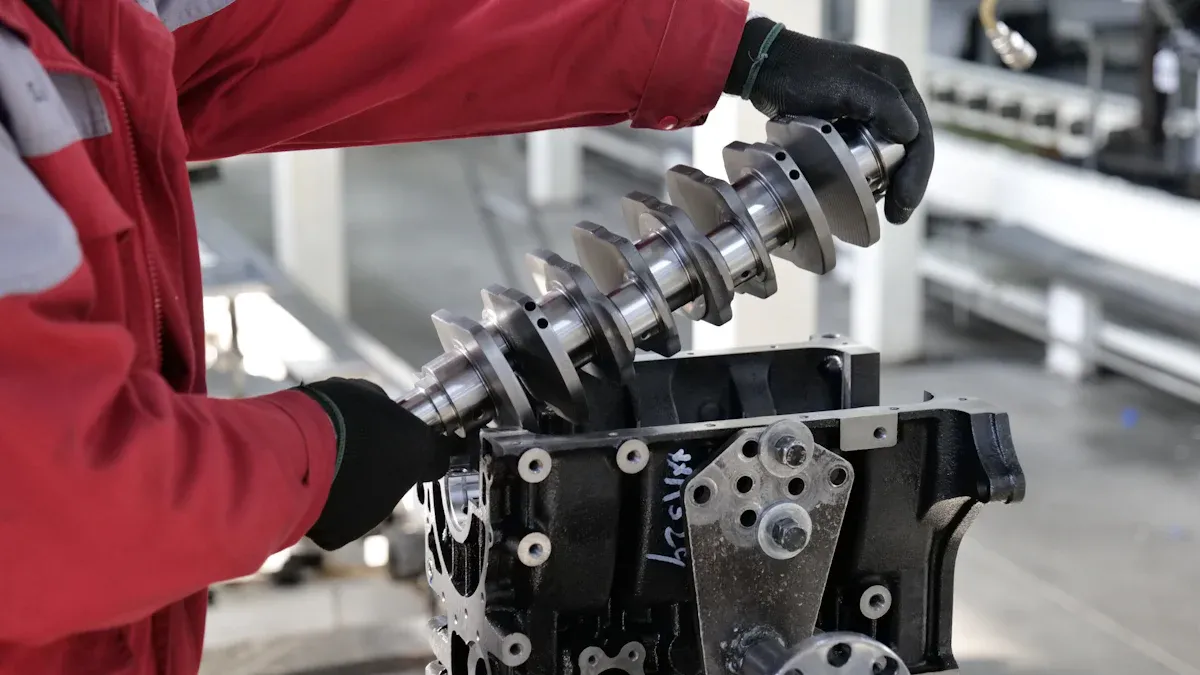
You can learn to install a bearing by being safe. Prepare your tools and keep everything clean. Most bearing failures happen because of bad installation. This happens about 90% of the time. Always wear gloves and goggles to stay safe. These protect you from cuts, burns, or eye injuries. Use care with every bearing you touch. This is true for Ball Bearings and Roller Bearings from E-ASIA.
Key Takeaways
Always put on gloves and goggles when you install bearings. This helps keep you safe from getting hurt. Use the correct tools, such as induction heaters and hydraulic nuts. These tools help make the installation safe and work well. Make sure your workspace is clean. Look at all the parts and check for damage before you start installing.
Bearings: Tools and Preparation
Essential Tools for Bearing Installation
You must use the right tools to install bearings safely. Wrong tools can break bearings and make them fail early. Always pick the correct tools like:
Induction heaters
Oil injection kits
Hydraulic nuts
Mechanical pullers
Presses
These tools help you avoid errors when installing bearings. Handle bearings with care. Keep bearings in a clean and dry spot. Do not open bearings until you are ready to use them. Only remove factory lubrication if the instructions say so. If you use the right tools and follow steps, your bearings will last longer.
Safety Gear and Cleanliness
Wear gloves and goggles every time you work with bearings. This gear keeps you safe from cuts and flying bits. A clean workspace is very important. Dirt and dust can get inside bearings and hurt them. Clean your work area often and check the air. Store lubricants in clean containers so they do not get dirty. If you want to install a bearing, always start with a clean space.
Tip: Use seals or shields to keep dust and water out of the bearing.
Inspecting Shaft and Housing
Check everything before you start. Look at the bearing surface, shaft, and housing for damage or rough spots. Measure carefully to make sure sizes match. Use this table to check the tolerance class for your bearings:
Tolerance Class | Ball Bearings | Cylindrical Roller Bearings |
Light | 0.0 – 0.06 | 0.0 – 0.07 |
Normal | 0.06 – 0.12 | 0.07 – 0.18 |
Heavy | 0.12 – 0.40 | 0.14 – 0.40 |
Check seals for wear or damage and change them if needed. Clean grease fittings and look for metal bits before installing wheel bearings. If you do these things, your bearings will last longer and work better.
How to Install a Bearing: Step-by-Step
Bearing Installation Methods
There are different ways to install bearings. The two main ways are press fit and shrink fit. Each way uses special tools and steps. You need to pick the best way for your bearing and how you will use it.
Here is a table that shows how press fit and shrink fit are different:
Feature | Press Fit | Shrink Fit |
Force Applied | Mechanical (press) | Thermal (expansion/contraction) |
Temperature | Ambient temperature | One part heated, or one part cooled, or both |
Process | Direct forcing of parts | Temperature change allows easy assembly |
Stress on Parts | Can be higher, localized | More uniform stress distribution |
Equipment | Arbor press, hydraulic press | Oven, induction heater, liquid nitrogen |
Press fit uses a press to push the bearing in. Shrink fit uses heat or cold to make parts bigger or smaller. This helps you slide the bearing into place. Do not use steel hammers or tools that make sparks. These can hurt the bearing and are not safe. If bearings get too hot, they can wear out fast. The grease can break down. The bearing can even lock up. Always use the right tools and follow the correct steps.
Studies show that 16% of bearings fail early because of bad fitting. Using too much force is a common mistake. To install bearings safely, use the right way and the right tools.
Install Bearings on a Shaft
You need to follow steps to put bearings on a shaft. This helps you avoid mistakes and damage. Here is a simple guide:
Surface Preparation: Clean the shaft and bearing bore. Take off any dirt, grease, or rough spots. Use a strong cleaner for best results.
Initial Positioning: Line up the bearing with the shaft. Put it at the edge of where it goes. Use an alignment tool if you have one.
Press Setup: Choose a pressing tool that fits the bearing’s inner race. This keeps the bearing safe.
Force Application: Use a press to push the bearing in. Press slowly and evenly until the bearing is in place. You can use a gauge to check the pressure.
Final Inspection: Check the bearing with measuring tools. Make sure it is straight and in the right spot.
Do not make these common mistakes when installing bearings:
Incorrect Shaft Fit Leading to Bearing Creep: If the fit is loose, the bearing can slip and wear out. Never use hammers to install bearings.
Overheating Bearings During Installation: Too much heat can ruin the bearing. Always watch the temperature.
Inaccurate Locking Mechanisms: Lock the bearing well so it does not move.
Misalignment During Installation: Use tools to check if the bearing is straight. Looking by eye is not enough.
Unsafe & Labor-Intensive Installation Processes: Use safe tools to lower the chance of getting hurt.
If you follow these steps, you will install bearings on a shaft the right way. Always use the same type of bearing as a replacement. Make sure the fit is not too tight or too loose.
Install Wheel Bearings
You need to follow special steps to put wheel bearings in cars. Here is a guide:
When you press the bearing into the knuckle, push only on the outer ring.
Put in the snap ring to lock the bearing.
Lightly grease and line up the splines of the CV shaft with the hub.
Take off and put in the hub.
Remove the spindle if you need to.
Put the brake rotor and caliper back.
Put the tire back on.
Tighten the lug nuts and lower the car.
You should also fill the wheel bearing with grease. Put the inner bearing in first, then add the bearing seal. Slide the hub onto the spindle and screw the nut onto the end.
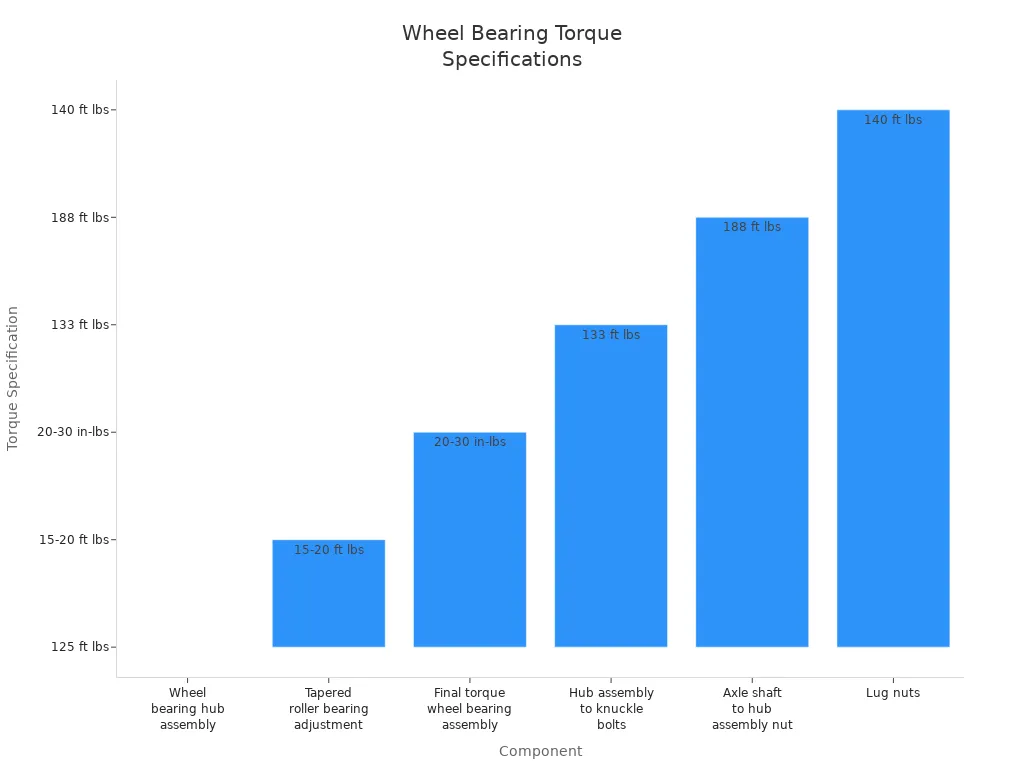
Here is a table with torque numbers for wheel bearing installation in cars:
Component | Torque Specification |
Hub assembly to knuckle bolts | 133 ft lbs |
Axle shaft to hub assembly large nut | 188 ft lbs |
Lug nuts | 140 ft lbs |
Wheel bearing hub assembly | 125 ft lbs |
Tapered roller bearing adjustment | 15-20 ft lbs |
Final torque for wheel bearing assembly | 20-30 in-lbs |
Tip: After you put in wheel bearings, take a test drive. This helps you check if everything works. If you see problems, ask a mechanic for help.
Post-Installation Checks
You need to check your bearings after you install them. This makes sure they work well. Here are some checks you should do:
Pin-Gauge Test: Use a pin-gauge after you press the bearing in. If it fits, you are good. If it does not, fix the fit.
Check for Material Shave-off: Look for bits between the bearing and housing. Make sure the housing has a slanted edge of 25-30 degrees.
Check for Incorrect ID After Press-Fit: Check the size of the housing bore.
Listen for Noises: Turn the bearing by hand. Listen for crunching, growling, or buzzing. These sounds can mean a bad fit or damage.
Look for Fatigue Marks: Look for marks or scratches on the raceway. These can show the bearing was not installed right.
Note: If you find problems, fix them before you use the machine. This helps stop the bearing from failing early.
Troubleshooting Common Issues
You may have problems after you install bearings. Here is a table with common problems and how to fix them:
Common Issues | Troubleshooting Steps |
Misalignment | Use vibration tests to find and fix alignment problems. |
Contamination | Use seals and check often to keep bearings clean. |
Improper Loading | Use the right load and do not overload. |
Lubrication Problems | Watch the temperature and grease the bearing often. |
You need to check if the shaft and housing fit right. Bad fits can make the bearing slip, break, or crack. Use an interference fit for inner rings that turn under load. Check the load and rotation to pick the best fit.
Almost half of bearings fail early because they were not installed or handled right. You can stop this by following good steps:
Best Practice | Description |
Proper Selection | Pick the right bearing for your job. |
Mounting Techniques | Use the right tools and steps to install bearings. |
Lubrication | Use the right grease and keep it clean. |
Alignment | Line up shafts to stop vibration and failure. |
Condition Monitoring | Watch the bearing to lower downtime and costs. |
Good lubrication is very important for bearings to work well. The right amount of bearing lubricant can change speed, noise, and how well the bearing works.
If you use these bearing installation methods and steps, you will install bearings safely and correctly. Your bearings will last longer and work better.
To install bearings the right way, follow these steps:
Choose the best mounting method for your bearings.
Keep all parts clean and ready.
Use the right tools, not hammers.
Store bearings flat in a cool, clean place.
Check everything before you start.
Proper installation keeps bearings working longer and helps you avoid costly repairs.
FAQ
How do you know if a bearing is installed correctly?
You should turn the bearing by hand. It must move smoothly. You should not hear grinding or feel resistance.
Tip: Always check for noise or rough spots after installation.
What tools should you avoid when installing bearings?
You must avoid steel hammers and sharp tools. These can damage the bearing. Use a press or induction heater instead.
Safe tools: Press, induction heater, alignment gauge
Can you reuse old bearings?
You should not reuse old bearings. Old bearings may have hidden damage. New bearings work better and last longer.
Note: Always use identical replacements for best results.
 English